Sunday, February 27, 2011

cinnamon sugar donut muffins!


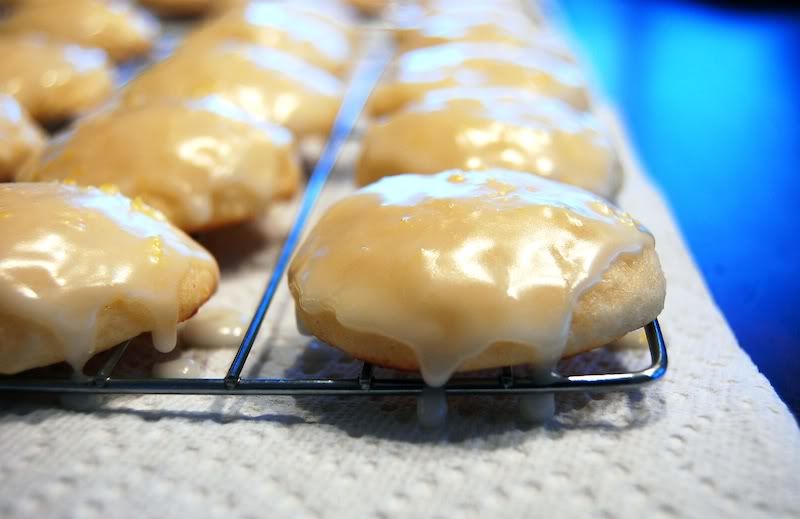
these donut-muffin hybrids (duffins? monuts?) may not be the most beautiful things to come out of my kitchen, but they sure are some of the most delicious. seriously, they're tied with my new favorite leave-in conditioner for "things that have completely rocked my weekend."

if you're not convinced yet, i've narrowed down the top 5 reasons why you should drop what you're doing and make these right now:

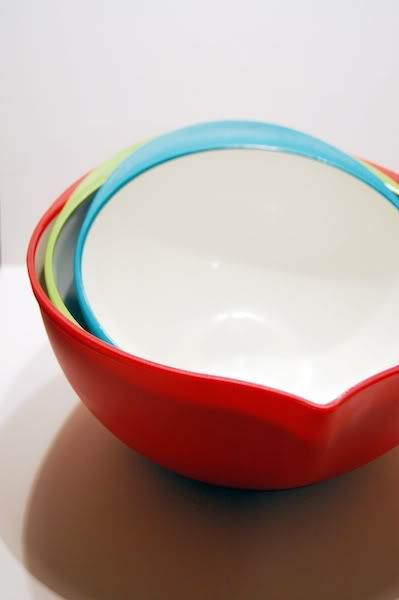
1. you don't need any fancy kitchen gadgets to make these, just a few bowls and good whisk. sometimes i dread lugging out the stand mixer and consider mixing ingredients together a form of exercise. well, it kind of is! strength training? anyone?

2. you also don't need a donut pan. don't get me wrong, they are totally cute and very popular but go against my rule of only buying kitchen gadgets that serve more than one purpose

3. they are totally kid-friendly and come together in an hour. none of the pesky waiting around to start enjoying cinnamon-sugary bliss.

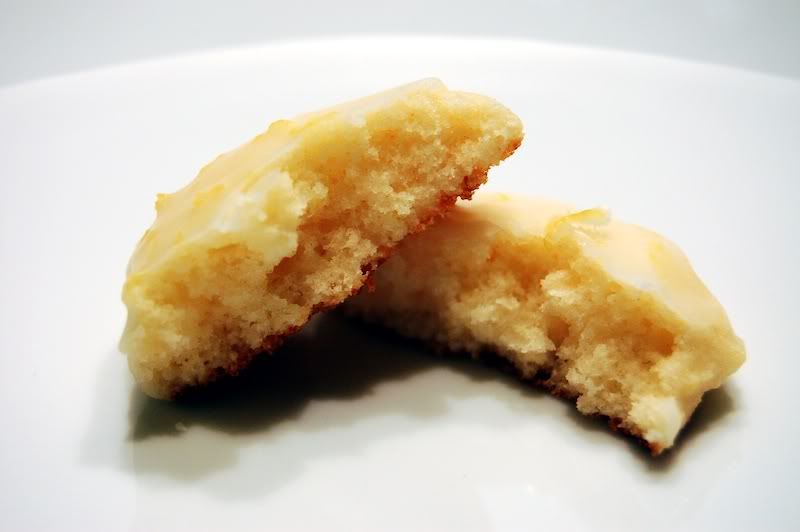
4. i cut the calories and fat from the original recipe a tremendous amount by substituting a few ingredients. this means, guiltless donut consumption! (when was the last time THAT happened?)

5. last but not least, they are 100% delicious and perfect at any time of the day. also, who could turn down a DONUT shaped like a MUFFIN?

i know you probably haven't made it to the end of the list without running to your kitchens to throw this together, but i'll continue with the post for when you come back, donut in hand.


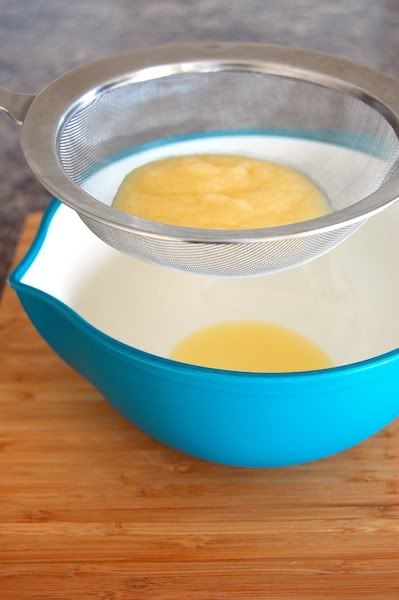
though i don't consider myself a "low fat" or "light" baker, i do have a few tricks up my sleeve on how to cut some of the unnecessary bad-for-you ingredients from baked goods. one great trick is substituting unsweetened applesauce for oils, which i did in my modified version of this recipe. 

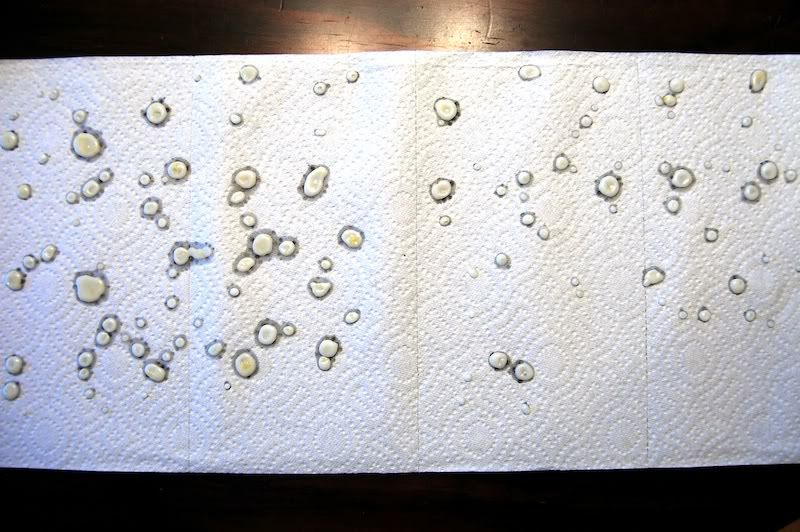
to use this technique, just put however much applesauce your recipe calls for in a sieve over a bowl and let it sit for 15-20 minutes. gravity will pull the majority of the moisture out of the applesauce, which would otherwise make your final product overly runny. if you don't have a sieve, you can mimic the effect by putting the applesauce between several layers of paper towels. it's a little messier, but it works!


these babies puffed up a lot, so i was glad that i only filled the tins up halfway. i used paper liners for the bigger version of the donuts (i ended up making minis too!) because i'm taking them to work and feel weird handing out unwrapped baked goods, but i think it takes away from their beauty a little. feel free to scrap the liners and just give your muffin tins a good spray before adding the batter.


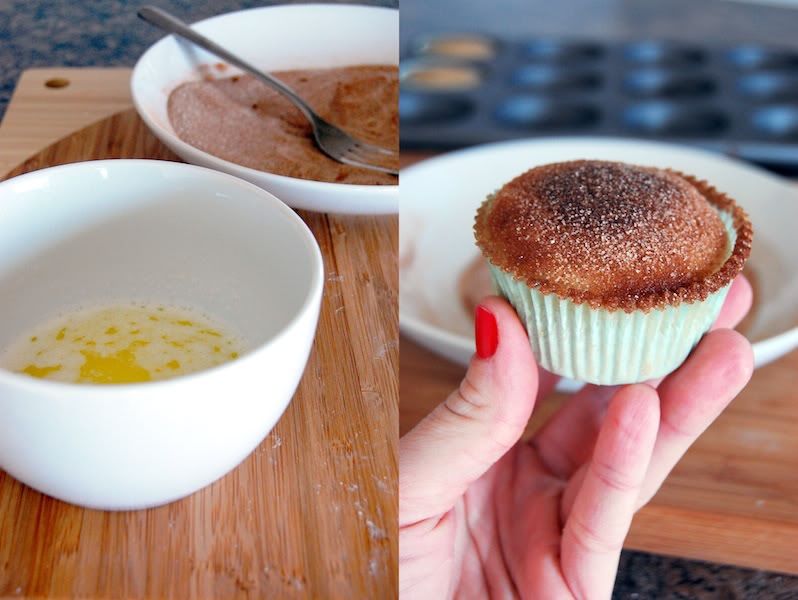
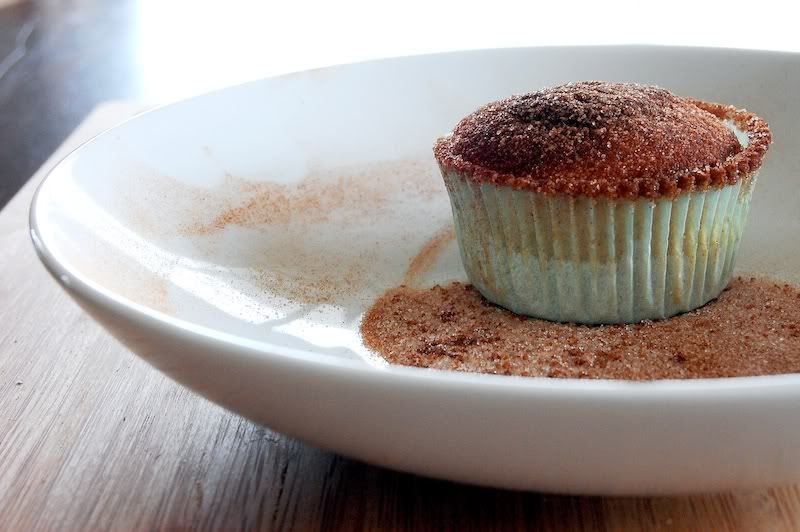
another way i cut the calories from these was by not submerging the entire donut in butter before rolling it in cinnamon sugar. instead, i just dunked the tops! i don't feel like i lost any of the effect or taste at all, but you can feel free to coat your entire donut if you're feeling crazy.


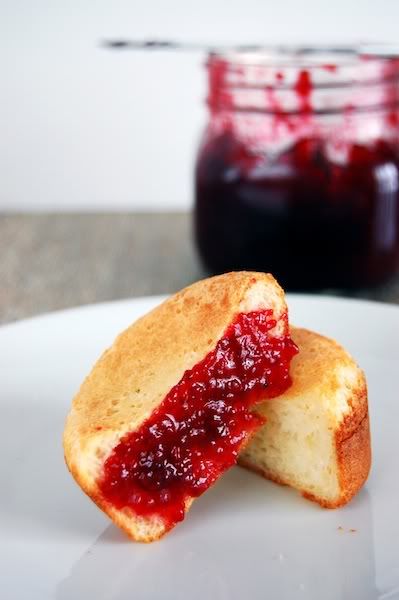
this recipe was so easy to make and would be a quick and easy brunch treat to whip up some lazy morning. they are also super versatile and could be just as easily glazed or stuffed with jelly - my personal favorite. the few substitutions i made didn't detract at all from the flavor or taste, but instead just cut the calories down from 275 to 162 - an enormous difference.

cinnamon sugar donut muffins


adapted from tasty kitchen
yields 12-13 standard-sized muffins (or 3 dozen mini-muffins)

ingredients:

1 3/4 cups all purpose flour
1 1/2 teaspoon baking powder
1/2 teaspoon salt
1/2 teaspoon nutmeg
1/2 teaspoon cinnamon
1/3 cup unsweetened applesauce, strained
1 tablespoon vegetable oil
3/4 cups granulated sugar
1 large egg
3/4 skim milk

for the topping:

2 tablespoons melted butter
1/4 cup granulated sugar
2 teaspoons cinnamon

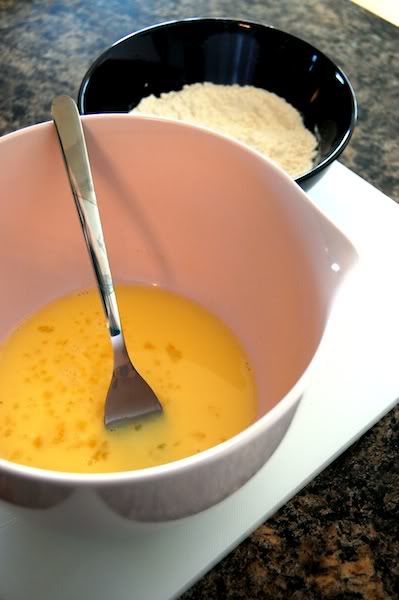
1. strain applesauce via sieve or paper towels for 15-20 minutes.

2. combine flour, baking powder, salt, nutmeg, and cinnamon in a bowl and set aside.

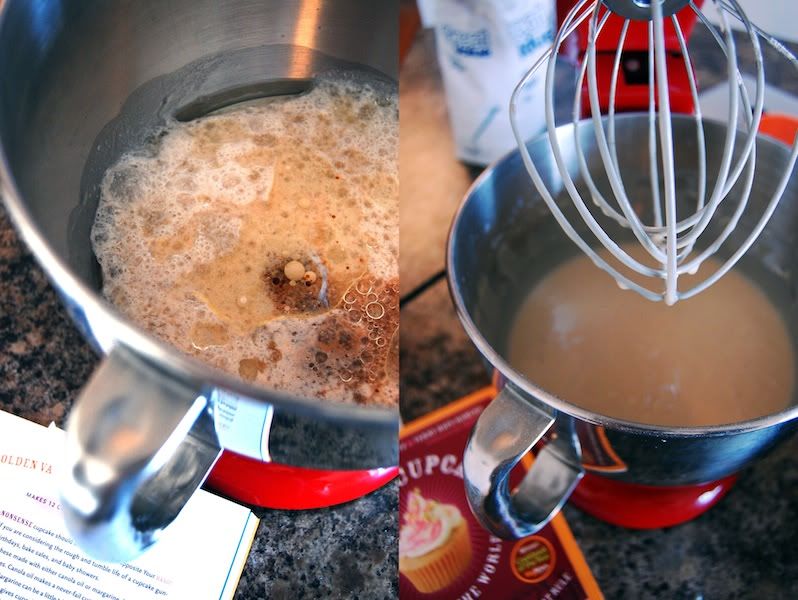
3. in a large bowl, whisk together applesauce, oil, sugar, egg, and milk until combined.

4. slowly add dry ingredients to wet ingredients and whisk together until no large lumps remain.

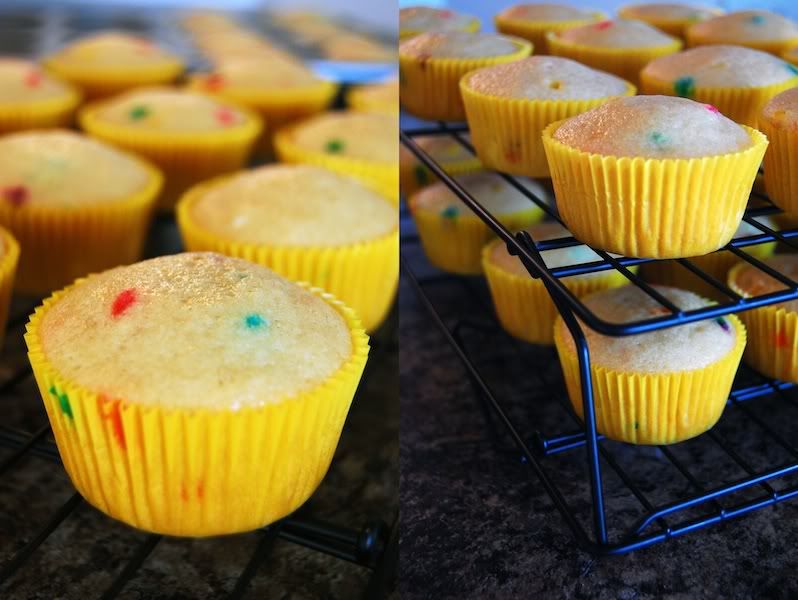
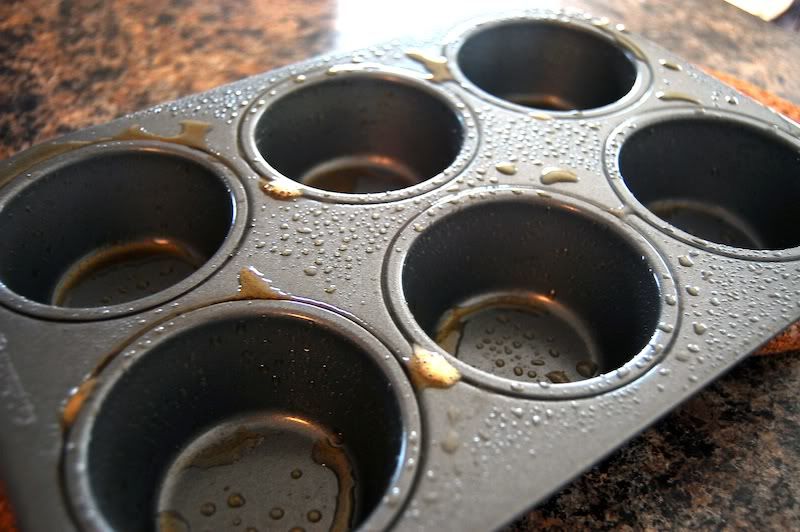
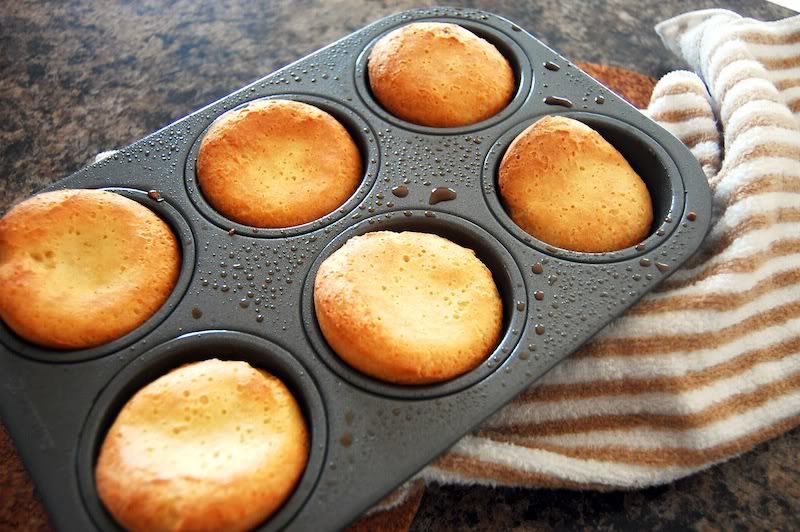
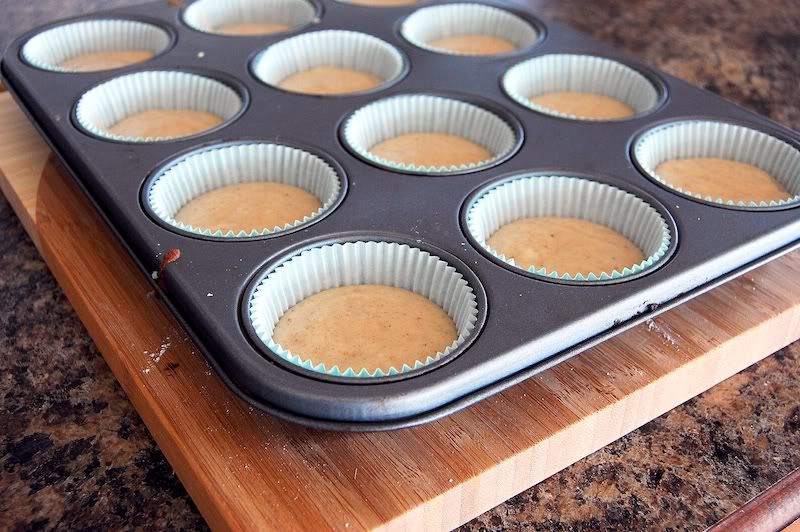
5. scoop into muffin tins and bake at 350 degrees for 15-17 minutes. (mini versions only need to bake for 7-8!). do not over-bake!

6. while your donuts are baking, melt butter in a heatproof bowl in the microwave. in a separate dish, mix together sugar & cinnamon until combined.

7. take donuts out of the oven and let rest for 1-2 minutes. while still hot, shake out of muffin tins. dip tops into butter, then sugar mixture, then let dry on wire rack for 5-10 minutes.

nutritional information:


calories: 162, fat: 3.25g, cholesterol: 21mg, sodium: 159mg, carbs: 30g, fiber: 1g, sugar: 16g, protein: 2.75g. 


before i go, i'd like to say a quick "thank you" to all the new readers that have been visiting my blog recently. welcome! if you have any questions, comments, suggestions, or requests, please feel free to get in touch via comment or at girlwhobakes@gmail.com. also, if you would like to know more about why i started this blog, or why i have all the nutritional information listed for my recipes, please check out my first entry right over here


as always, thanks for reading & happy baking!


amanda

Saturday, February 26, 2011

oatmeal dark chocolate chip cookies (with flax!)


after an extremely long week, i wanted to make a comforting-yet-healthy treat to compensate for the half dozen mini-cupcakes, white wine, and pizza i've consumed recently. i went straight to a crispy on the outside and chewy on the inside cookie with dark chocolate chips (delicious & healthier than the milk version), oatmeal and my secret ingredient - flax.


now that i have you hooked, let's talk about flax. this stuff is one of those hippy foods that i never thought i would have in my kitchen, much less try to somehow pack into everything i eat. seriously - a substitute for bread crumbs, sprinkled in oatmeal and yogurt, it can even be used as an egg substitute! its got omega 3s (lowers cholesterol & blood pressure), works as an antioxidant and has tons of fiber. it's win-win - promise. you can get a big bag at trader joe's for a few dollars. you won't regret it!


these cookies came together super quickly in just a few steps. you can totally adjust the spices to your liking with these, which makes the recipe a great and healthy base that you should keep in your back pocket. a crucial part of this recipe is using sea salt, which i think adds oomph to anything with chocolate - especially cookies.


i used brown sugar in these because, well, i think it's like sugar - but better. i went light brown, but you could totally use dark brown and up the molasses-factor. (side note: this is a half batch that made around 15, so if you do a full batch prepare for about double this size!).


whenever trying a new cookie recipe i like to bake them at different times and with different strategies (i.e. chilling, flattening, etc.) to see what works best with the dough. these i baked in rounded 2 teaspoon portions and in 9 minutes they turned into this gorgeous golden brown. i like mine a little crispier, so i would probably go 10 minutes next time.


these cookies are delicious, wholesome, and for around 90 calories a pop they are a caloric bargain.

onto the recipe!

oatmeal dark chocolate chip cookies (with flax meal!)

makes about 30 cookies
adapted from the nourish network

ingredients:

3/4 cup whole wheat flour
1/4 cup ground flaxseed
1/2 cup oats
1 teaspoon baking soda
1/4 teaspoon cinnamon
1/4 teaspoon allspice
1/4 teaspoon ginger
1/2 teaspoon sea salt
4 ounces butter, softened
2/3 cup packed light brown sugar
1 large egg
1 teaspoon vanilla extract
1 1/2 cup dark chocolate chips

directions:

1. preheat oven to 350 degrees fahrenheit.

2. in a medium bowl whisk together flour, flax, oats, baking soda, spices and salt.

3. cream together butter and brown sugar until light and fluffy. add egg and vanilla and combine.

4. add dry ingredients 1/2 cup at a time until incorporated but not over-mixed. stir in chocolate chips.

5. drop rounded scoops onto a lined cookie sheet and bake for 9-10 minutes.

nutritional information:


calories: 90, fat: 5g, cholesterol: 12mg, sodium: 39mg, carbs: 11.24g, fiber: 1g, sugar: 7.8g, protein: 1.15g.


thank you for reading & happy baking!


amanda

Friday, February 25, 2011

a quick check-in!


it seems i have gone m.i.a. from my favorite little corner of the internet. 

last weekend involved a speedy trip down to dc to visit my family and be stuffed full of my all-time favorite pizza & my wonderful mother's cuban food. 

as soon as i got back i had an enormous event at work that i am happy to report went off without a hitch, but that i am still recovering from. quite literally, actually. my feet are not pleased about having spent the night in heels.

anyway, i hope you are all doing well out there and that your lives have been a little less hectic than mine. if they haven't been, i hope you're napping right now and not reading this silly update. 

either way, i have a few recipes that i'm excited to try this weekend - so check back soon! 

amanda

ps: i've recently received some really lovely and flattering feedback about this site from folks and wanted to send out a general "thank you!" to every one who has been supportive of girlwhobakes. as always, if you have any questions or advice or requests i'd love to hear from you! 


Sunday, February 13, 2011

vegan funfetti cupcakes


i have an awesome boss. part of her awesomeness stems from what a great gift-giver she is. for the holidays i got a gigantic set of sharpies, a three pack of the best-smelling antibacterial gel ever, and vegan cupcakes take over the world. oh i know, she rocks.

before receiving said gifts i had spoken at length with her in our tiny office about how i wanted to get into vegan baking, but was apprehensive about it as unknown baking territory. i've been taking baby steps via breads & cookies to build my confidence, but this weekend i decided that i was ready for the big leagues - cupcakes! - and armed myself with almond milk, vinegar, and earth balance.


i won't lie to you, i was nervous from the get-go, especially since the word "curdle" was in the first step. but, i took a deep breath and trusted the process and curdled it up. 


the batter was way more like a science fair project than a cupcake base. it was bubbly and reacting to itself and i'm pretty sure i could have made it explode if i had tossed a mentos in it. i started with my paddle attachment, but that was far too messy. i switched over to a whisk and it was way smoother sailing.

additional anxiety kicked in when i realized that the batter was an unpleasant khaki color instead of the golden-y goodness that i know and love, but through magic or science or oven gnomes that issue was resolved.


and i got beautiful, springy, perfectly-domed cupcakes! amazing.

by the way, if you bake at all and have limited counter space i highly, highly recommend investing in stackable cooling racks. hell, even if you have a giant kitchen there's no reason to waste space by having racks side-by-side. plus, then you can call each rack a "floor" and pretend that your cupcakes are in a fancy hotel. or not. cause that would be weird. anyway..


while the cupcakes cooled and i prepped the frosting everyone in my house decided it was nap time, including flapjack. he's 18 pounds. seriously. (not pictured: his sister, waffles).


in the end, the frosting is what got me. i'm pretty particular about my frostings and don't really have recipes, per se, but i have a general idea of what i want it to taste like and i adjust as i go. working with shortening and earth balance was a bit of a challenge for me and i think i need to do a little more research into how to achieve the perfect vegan buttercream.

i will say that it piped on pretty nicely and tasted a lot better once i let it set up in the fridge. i'm interested in if it will continue to improve with time, so i guess i'll have to force myself to eat one tomorrow. bummer.

overall, i'm pretty happy with how these came out, especially considering i'm a complete rookie. i would not have guessed they were vegan, which is my goal for animal-free baking, and was surprised at how delicious the batter was after it hung out in the oven for a while.

vegan funfetti cupcakes

adapted from vegan cupcakes take over the world
yields 28

ingredients:

2 cups almond milk (you could use soy, i've just been on an almond kick!)
2 teaspoons apple cider vinegar
2 1/2 cups all-purpose flour
4 tablespoons cornstarch
1 1/2 teaspoon baking powder
1 teaspoon baking soda
1 teaspoon salt
2/3 cup vegetable oil
1 1/2 cups granulated sugar
2 teaspoons vanilla extract
3 teaspoons almond extract

1. whisk milk & vinegar in a measuring cup and set aside so it gets nice & curdle-y

2. preheat oven to 350 degrees fahrenheit & line muffin pan

3. sift together the flour, cornstarch, baking powder, baking soda, and salt

4. with a whisk attachment or by hand, beat together soy milk mixture, oil, sugar, vanilla & almond extracts

5. add dry mixture to wet mixture and mix until no large clumps remain

6. carefully fold in 3-4 tablespoons sprinkles, medium-sized to large work best

7. fill up your lined pans two-thirds of the way (this is where an ice cream scoop comes in handy!) and bake for 18-20 minutes, or until a skewer comes out clean

8. let cool for 5-10 minutes in pan and then transfer to a cooling rack to cool completely

vegan buttercream frosting

(note: this is not a perfected recipe, so make sure to test your icing out as you go and adjust!)

ingredients:

1/3 cup non-hydrogenated shortening
1/3 non-hydrogenated margarine (i used earth balance)
3 cups sifted confectioner's sugar
up to 3 tablespoons almond milk
1 teaspoon vanilla extract
2 teaspoons almond extract
1/8-1/4 teaspoon salt (this sounds weird, i know, but i think it's essential in buttercreams)

1. beat together shortening & margarine until combined and fluffy

2. add sugar 1/2 cup at a time and mix

3. add extracts to taste

4. add salt to taste

5. if you need the icing to be less stiff, add milk a teaspoon at a time until it reaches the right consistency

6. decorate away!

nutritional information:


calories: 219, fat: 9.6g, cholesterol: 1mg, sodium: 162mg, carbs: 31.24g, sugars: 21g, protein: 1g.


as always, thank you for reading & happy baking!


amanda


ps: first of all, thank you for reading this far! secondly, if you end up making anything you've read here or have any suggestions i would love to hear from you! seriously, let's talk!

Saturday, February 12, 2011

valentine's day cut out cookies with marbled frosting


if you obsessively follow baking trends online like i do, i'm sure you know that really beautiful & elegant cutout cookies have been making the rounds for valentine's day. the general consensus on these cookies are that they are painstakingly difficult, specifically the icing, so of course i needed to give them a try.

to be honest with you all, i didn't think these were going to be successful at all and i went into the project with the notion that this batch would be my pre-documentation test run. i was happily mistaken and i think these, by and large, came out pretty well. 

i wanted to make sure that these cookies didn't just look pretty, but that they tasted great too. i spent a lot of time researching and adjusting recipes to come up with one that was delicious and that baked flat and evenly enough to ice. 

this batch of around two dozen took me, all together, around six hours to make. the icings are all hand-tinted with gel colors and each of the cookies had to be dammed, filled, and the marbled. needless to say, this is not an every-day cookie. but, for someone whose ideal saturday morning is staying in her pajamas, sipping iced coffee, listening to npr and decorating twenty four cookies by hand it was wonderful. plus, i think the results are pretty impressive.


there's no recipe this time around, mostly because i'm still tweaking and i want to have photographs to go along with the instructions.

to aid in forgiveness, i will divulge that tomorrow i'm making vegan funfetti cupcakes from scratch, so please come on back!

amanda


Thursday, February 10, 2011

my top 5 baking must-haves!

reading food blogs is like having the chance to peek into the recipe books of all different kinds of people and read the scribbles in the margins. the little tips & tricks that you can only learn from trying and tweaking a recipe until it's perfect.

being the overly curious person i am, i also adore when people show not only how they cook - but with what. y'know, all the kitchen tools and gadgets that make the baking experience easier, more fun, or more delicious.

along with being curious, i'm also pretty cheap with a tendency to go overboard in the stuff department. therefore, i do my best to only buy things that i will use on a regular basis.

so, without further ado, here are the five things i could not do without when i bake!


parchment paper

let's start off simple! parchment paper is the best for cookies, whoopie pies, or anything else you bake on a sheet. you can reuse the sheet a few times, so doing multiple rounds of baking is no problem - really helpful when you have to bake several batches off. a roll costs about $3.


a set of mixing bowls

i've been in the market for a good set of mixing bowls for a while now. this might surprise you, it might not, but i had a lot of requirements in my search. i needed them to nest (for space reasons), to have a spout (for pouring purposes), to be light-weight (i'm lazy), dishwasher-safe (i'm double-lazy), and microwave-safe (for melting chocolate in, then licking, in laziness). this set of three was about $25.


batter scoops

i use these, quite literally, 9 out of every time 10 times i bake. the smaller one is about two teaspoons (cookie size!) and the larger one is about a quarter cup (cupcake size!). they also make portioning and making evenly sized baked goods really easy. together these were about $12. 


batter blade

okay, so this is a new and slightly frivolous addition to my top five, but it absolutely blows my mind. this is an alternative blade attachment for a traditional kitchenaid mixer, but the amazing part is that it simultaneously scrapes down the bowl while it mixes. seriously, an unbelievable invention. this was a valentine's day gift, but i think it's around $25.


kitchen scale

okay friends, i saved the very best for last. kitchen scales can be incredibly helpful for making accurate measurements, specifically for dry ingredients. sometimes recipes - macarons are a great example - will require you to measure things to the gram, and this little machine makes that possible! 

my scale has also been maybe the most important staple in my kitchen since i health-ed up my lifestyle. it's been really crucial in understanding and serving correct portion sizes, and therefore making good decisions about what i put in my body. i think americans have a very skewed perspective on what portions should look like, and this takes all the guesswork out of it. it is absolutely the first tool i would recommend to anyone looking to adjust their diet. they generally run around $20.

i hope this has been informational and at least a little entertaining! i'd love to know what you guys use in your kitchens. 

this weekend is going to be jam-packed with baking fun, so stay tuned!

amanda

Sunday, February 6, 2011

vegan ginger cookies with lemon royal icing


okay guys, i have a confession to make. it's not something i'm proud of, but admitting you have a problem is the first step.

i am not an inclusive baker.

in a world ripe with food allergies and ethical eating i still throw as much butter, flour, eggs and nuts into a recipe as i possibly can. it's not right, but it is delicious.

part of my foray into vegan baking has been as an attempt to make my baked goods available to more people. other bonuses include being forced out of my ingredient comfort zone and being able to make stuff when i use up all the butter & eggs and am too lazy to buy more.
 
i'm really still getting the hang of things - my last few attempts have been quite embarrassing - so any tips & tricks you can throw my way would be amazing.


equal parts molasses, oil, and sugar. i used brown instead of white because..well, it's how i roll. perk: these cookies come together in one glorious bowl. speaking of bowls, i got a new set as an early valentine's day present and i am in baking heaven.


let's veer slightly off topic for a minute. so, like i said, i'm new at this whole vegan-baking thing. to get these cookies the way i wanted them i had to adjust several parts of the recipe. the cookie on the top left-hand side was made according to instructions, but turned out way too mounded and dense for me. 

the next couple i smooshed a little with a glass and they were closer to what i was looking for. the bottom cookie, which i think turned out the best, is the last and final version and the recipe i have posted at the bottom of this entry. 


so, i know that there is a spoon in this shot and that would lead you to believe it was used. honestly? i barely touched it. by the end of the mix-a-thon i was using my hands to get everything combined. it was awesome.


these cookies are dark and spicy and right up my alley, but i couldn't resist adding a little sweetness and acidity through a few squiggles - the technical term - of vegan lemon royal icing. i had to figure this one out, since royal icing is traditionally made with eggs, but i managed!

note: there was no way that for a one-bowl cookie recipe i was going to break out the piping tips. no way, no how. i just grabbed a ziploc bag, poured the icing in, sealed it up, cut a tip hole in the bottom corner and got to icing. painless!


these cookies are actually very delicious, and not even "for vegan cookies". they are great alone, but the icing dresses them up a little bit. alternatively, i think they would be great rolled in some raw sugar. or, not to get crazy, lemon-infused raw sugar!

onto the recipe!

vegan ginger cookies with lemon royal icing

yields 2 dozen
adapted from veggie revolution

preheat oven to 350 degrees f

for cookies:

1/2 cup vegetable oil
1/2 cup brown sugar
1/2 cup molasses
2-3 tablespoons hot water
1 3/4 cups flour
2 teaspoons ginger
2 teaspoons cinnamon
1 teaspoon baking soda
1/3 teaspoon salt

1. in a medium-sized bowl combine oil, sugar, molasses & hot water.

2. stir in flour, ginger, cinnamon, baking soda & salt. combine with spoon/hands.

3. if batter is too dry/sandy add a teaspoon of water a time until it reaches a workable consistency.

4. bake on a parchment-lined baking sheet for 8-9 minutes. cookies might appear under-done, but will harden as they cool.

for lemon icing:

1 cup confectioner's sugar
juice from half a medium lemon
2 teaspoons light corn syrup

1. in a small bowl mix sugar and lemon juice until smooth. 

2. add corn syrup and beat until smooth and glossy. if icing is too thin, add more sugar. if it's too thick, add more juice or corn syrup. 

3. pour into ziploc bag, seal, and cut small hole in bottom corner. decorate away!

nutritional information:

calories: 120, fat: 4.4g, sodium: 80mg, carbs: 19.22g, sugars: 10g, protein: 1g.

thanks for reading & happy baking!

amanda

Saturday, February 5, 2011

lemon ricotta cookies


after a week spent with the entirety of southeast michigan freaking out about blizzards and whiteouts, i innocently thought i could have a weekend to relax and run errands and avoid scraping off my car multiple times a day. boy, was i wrong.


i decided i needed a reminder that summer will eventually come, so i grabbed some lemons and leftover low-fat ricotta cheese and went to work on a giada delaurentiis recipe i had bookmarked.


 no offense to giada, but i bumped up the lemon-factor in both the cookie and the glaze - about double what the recipe called for. i also made them a bit smaller, which lowered the calories and made them way cuter.


giada, with all the brains in her giant forehead, says to ladle the glaze on and spread it over the cookie. i decided to take a different route and just dip these suckers in the glaze and wiggle off the excess.


just make sure to put something underneath your drying racks before you start the glazing process or prepare yourself for a messy table.


if you're a cakey-cookie person, these are for you. the only trick to these is to make sure you don't over-bake them. i kept an eye on the bottoms and when they were golden brown i took them out of the oven, despite the fact that they looked completely under-done on top.


lemon ricotta cookies

yields about 3 1/2 dozen
adapted from giada de laurentiis

cookies:

1 1/4 cups all-purpose flour
1/2 teaspoon baking powder
1/2 teaspoon salt
4 tablespoons unsalted butter, softened 
1 cups sugar
1 egg
8 ounches low-fat ricotta cheese
3 tablespoons lemon juice
1 lemon, zested

glaze:

3/4 cups powdered sugar
1/4 cup lemon juice
1 lemon, zested

(note for glaze: you can adjust the consistency of the glaze by adding more sugar if it's too runny & more juice if it's too thick!)

preheat oven to 375 degrees f.

1. in a medium bowl combine the flour, baking powder, and salt.

2. in a large bowl, cream butter and sugar using an electric mixer until light & fluffy. add the egg and beat until incorporated. add the cheese, lemon juice, and zest. beat until combined.

3. add the dry ingredients until just combined - don't overmix!

4. line baking sheet(s) with parchment and spoon dough, about two teaspoons for each cookie, onto the sheets. bake for ten minutes, until slightly golden at edges. remove from the oven and let the cookies rest for fifteen minutes.

5. while cookies cool, combine powdered sugar, lemon juice, and zest in a small bowl and stir until smooth. dip cooled cookie tops into glaze and let glaze cool and harden for about two hours.

nutrition information:

calories: 67, fat: 1.7g, cholesterol: 5mg, sodium: 49mg, carbs: 11.71g, fiber: 0.13g, sugars: 7.8g, protein: 1.27g.

thank you for reading & happy baking!

amanda

Wednesday, February 2, 2011

healthy & easy popovers!


when i was going to grad school in boston my local coffee shop had these popovers people would freak over. seriously. i studied there with regularity and only saw the actual popovers for sale a handful of times, mostly because people would snatch them up as soon as they came out of the oven. as a learned today, that's the absolute best way to eat them.

i was convinced these pillowy babies would be complicated to make and full of butter and guilt, but they were surprisingly easy and this recipe cuts the fat in half!

i'll confess to you, i think there is a learning curve with popovers and mine didn't pop as much as i'd like, but the taste is all there and hopefully you can benefit from my mistakes! plus, how convincing would it be if every recipe i posted was perfect?

i made mine in muffin tins because i hate buying anything that serves only one purpose, unless it's a really good purpose (i.e. ice cream machine!), so i cut the baking time down by five minutes. if you have a popover pan, feel free to tack on an extra five to your baking time.


these are all the ingredients! dry ingredients and wet ingredients. the only catch is that the eggs and milk should sit out for about thirty minutes before you mix everything together - it helps the popovers "pop"!

the pans are oil and pre-heated in a hot oven before the batter goes in.


these are just too cute! my edges started popping, but i know they are supposed to get taller. when i make these next, i'm going to bake them at 425°f for the first 10 minutes and then lower it to 375°f degrees for the last 25.


seriously, i might go sneak one of the leftovers right now.

the great thing about this recipe is that you can totally build on it. add herbs, cheese, ice cream, whatever! if you come up with a delicious concoction, let me know!

onto the recipe!

popovers

yields 6
adapted from cooking light

1/2 cup all-purpose flour
1/4 teaspoon salt
1/2 cup low-fat milk
1 large egg
1/2 tablespoon butter, melted
cooking spray

1. combine flour & salt in a small bowl, stirring with a whisk.

2. combine milk & eggs in a medium bowl, stirring with a whisk until well blended. let mixture stand for 30 minutes.

3. while you're waiting for your wet ingredients to come to room temperature, preheat your oven to 425°f and coat a half-dozen muffin tin with cooking spray.

4. after 30 minutes, gradually add flour mixture to egg minutes and combine well with a whisk. stir in melted butter.

5. place pan in the oven for 5 minutes, then divide the batter evenly among prepared and heated pan and bake for 35 minutes - 10 minutes at 425°f and the last 25 minutes at 375°f - or until golden brown and popped!


nutritional information


calories: 90, fat: 3.3g, protein: 3.9g carbs: 12.2g, fiber: 0.4g, cholesterol: 51mg, sodium: 172mg


thanks for reading & happy baking!


amanda